Support Home » VirtualHostX » How To's
How Do I Edit Files Inside the Virtual Machine?
Last Updated December 9, 2019
With the exception of your websites' files themselves, all of the other configuration files and settings related to VirtualHostX's web server are stored inside the virtual machine - not on your Mac.
If you need to edit one of those files - Apache's main .conf file as an example - you have a two options:
- You can login to the virtual machine using an SSH connection (i.e. through a Terminal window) and edit the file using a command line text editor such as nano (easy) or vim (advanced users).
- Or, you can use a traditional macOS GUI text editor with the help of another app such as Transmit or ExpanDrive.
In the following sections I will show how to edit the web server's main configuration file using the two methods above. The file we'll be editing is located inside the virtual machine (not on your Mac) here:
/etc/apache2/apache2.conf
Editing a File Using the Command Line
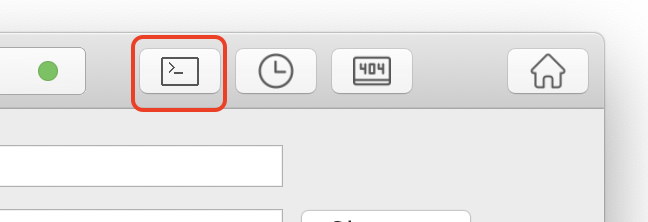
First, launch VirtualHostX and then click the "Terminal" button in the app's toolbar to connect to the virtual machine.
In the Terminal window that appears, type the following command and press return:
nano /etc/apache2/apache2.conf
The nano text editor should open in your Terminal window and show the contents of that file. You can make any neccessary edits and then save your changes. Here is a tutorial for using nano. 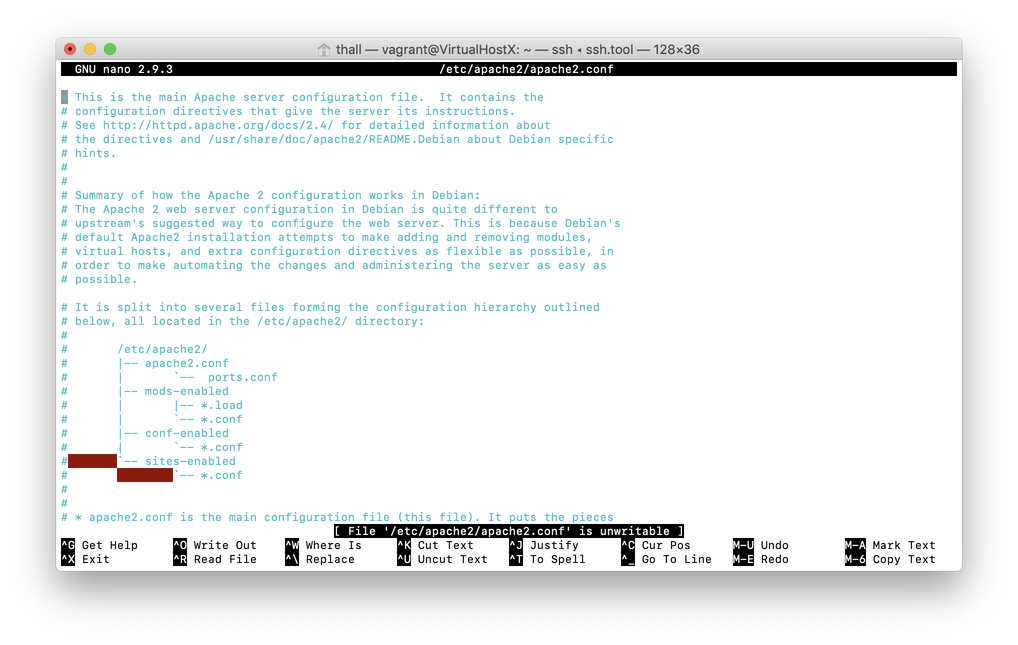
Editing a File Using a macOS Text Editor
Using a 3rd party app like Transmit or ExpanDrive will let you browse the virtual machine's filesystem and edit files using your preferred macOS text editor. Here are instructions for connecting with Transmit:
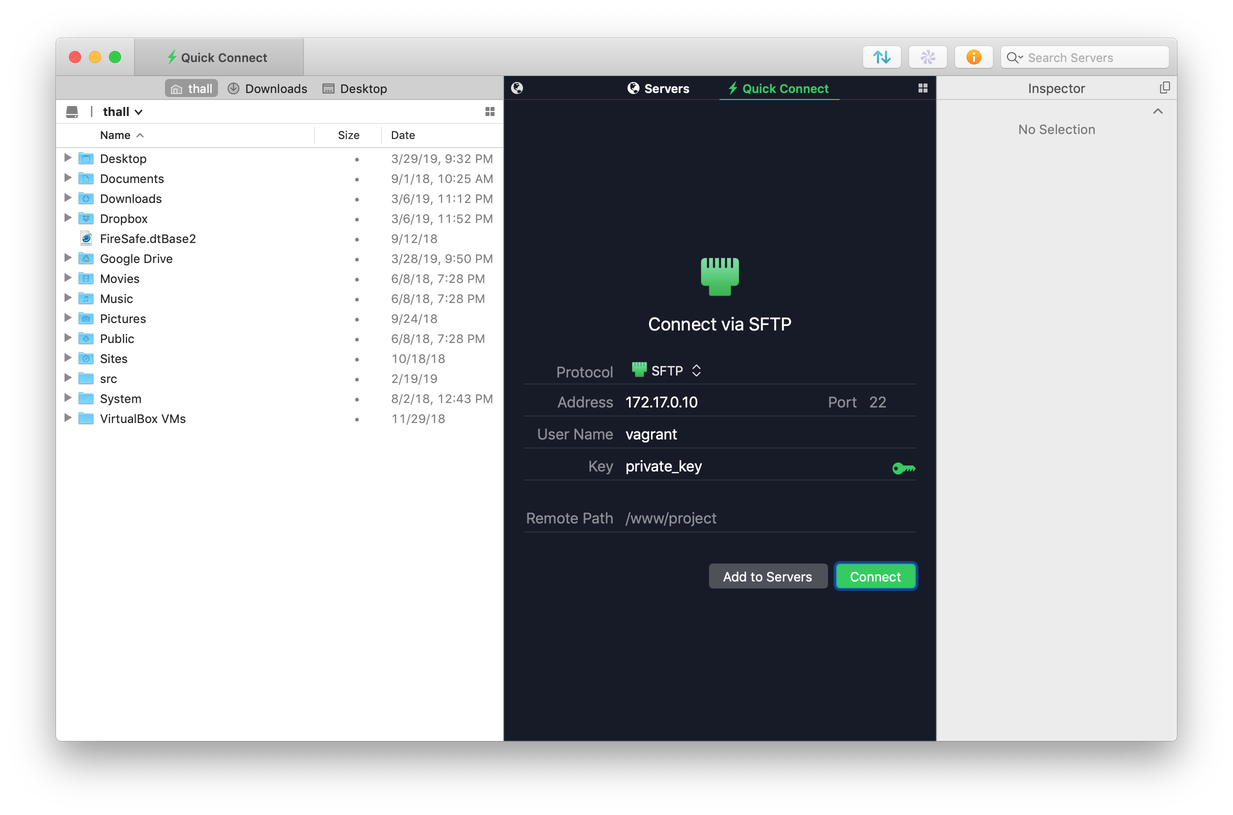
Create a new connection and enter the following settings:
Protocol: SFTP
Host: 172.17.0.10
Port: 22
User Name: vagrant
Password:
Instead of using a password to connect, we need to use a "private key file".
- Open Transmit's Preferences window from the "Transmit" menu.
- Click on the "Keys" section icon.
- In the lower left corner of the window, click on the "+" button and choose "Import Keys...".
- An Open File dialog will appear. On your keyboard, press command+shift+G to open a "Go to the folder:" sheet and enter the following key file location...
~/Library/Application Support/com.clickontyler.VirtualHostX/VirtualHostX/.vagrant/machines/default/virtualbox/private_key - Click the "Import" button.
- Close the window and go back to your connection settings. Click the "Key" icon and choose the new private key you just imported.
You can now click the "Connect" button to log in to the virtual machine and browse your files. I recommend saving your connection settings as a favorite within Transmit to remember your settings for the next time.
Danger: How to edit *ANY* file inside the virtual machine as root
If you need to modify a system file, such as your PHP or Apache config files, you'll need to have root access to do so.
If you login via the command line, you can simply prefix all of your shell commands with sudo to run them as root.
However, if you want to use a text editor or other software on the Mac side of things, you'll need to connect over SFTP as the root user. For security reasons, this is disabled by default. But you can turn on this feature...
- Login to the virtual machine using the Terminal button in VirtualHostX.
- Run this command:
sudo cp -r ~/.ssh/ /root/This will copy your authorized SSH keys into the root user's home folder. - Next, change your connection settings in your app to login as
rootinstead of thevagrantuser that was described earlier in this FAQ.
You should now have full access to edit system files when you connect.